Fundamentals
📝 Author
Birat Aryal — birataryal.github.io
Created Date: 2026-03-22
Updated Date: Sunday 22nd March 2026 14:21:04
Website - birataryal.com.np
Repository - Birat Aryal
LinkedIn - Birat Aryal
DevSecOps Engineer | System Engineer | Cyber Security Analyst | Network Engineer
The basic set of commands or the mindset that you must have for the embedded into you muscle memory, so that it would be useful in case of any issues or troubleshooting the issues or concerns raised on any of the environment.
Boot Process
The Boot Process on Linux - On-premise and EC2 - AWS are kind of similar. Apart from few components are added on the Cloud based instance creation. The EC2 Boot process only includes the additional step that would be carried out on the cloud infrastructure. Like for the On-premise environment if we create the VM we define the resources first on the VMware or any of the virtualization layer.
🖥️EC2 Boot Process - Pre-provisioning
When we first launch an EC2 instance AWS would process these information:
- AMI ID: The AMI has the type of the Operating system that is to be deployed. This AMI ID also determines what type of boot mode is to be used. UEFI/BIOS E.g.. RHEL, Ubuntu etc.
- Instance Type: This looks which resource to apply to the Instance that is created. like t2micro, t3nano etc.
- Subnet: What subnet is to be applied while creating an ec2 instance and where the subnet lies on which VPC
- Security Groups: What policies are to be applied, if needed to create the new policy then it would create the policy first.
- Key Pair: For the accessibility of the ec2 instance what public key is to be used.
- IAM Instance Profile: This verifies the role assigned to the EC2 instance that would be created. Suppose if the EC2 instance needs to have the access of the s3 bucket or the dynamo DB, then IAM Instance Profile would be attached which would be the separate container or the service provided by AWS which would attach the only one policy defined in the IAM role. This only acts as a wrapper as EC2 API could not directly attach role.
- Block Device Mapping: This defines how the storage is attached to the instance at the launch time. We are basically telling AWS where the disk exists and where should they come from and how they should behave. The volumes are attached to the instances via Nitro and exposed to the instance as NVME devices.
- Meta Data Options:
- User Data: This stores the first time configuration script that is to be executed inside the instance. This would be used later on at the cloud-init step.
⚙️ Boot Process
On the EC2 once the pre-provisioning tasks are completed then once the instance or VM is created then it would be powered on this process.
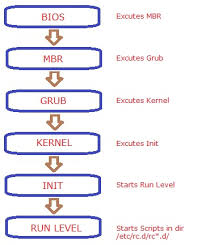
- BIOS/UEFI: framework is loaded which stores the details of the partition type that is to be used either GPT or MBR.
- POST: after the BIOS is loaded then it would check all the external devices like keyboard, mouse, CPU, RAM, Disks would be checked and if any corruption is seen then it would be shown on the console itself.
- Boot Loader: Grub2 bootloader would be loaded from
/boot/grub2/grub.cfgwhich would then trigger the kernel modules that would be required for the OS to boot. This presents the boot menu, and loads the selected kernel image (vmlinuz) and initial RAM disk (initramfs) into the memory. - Kernel Load: Once received the signal for the modules to be loaded then all the kernel dependent modules are loaded and once all the modules are loaded then it would send the signal to the init or systemd initialization. Initramfs would be mounted temporary root filesystem. Once mounted, kernes executes binary in /sbin/init which in latest linux is systemd (PID 1).
- Init/Systemd: Systemd services would be started which would start all the services required for the system services.
- Run Level: At this stage OS would be started and then other user level services would be started at this stage like: user login, graphical interface, network, user profiles initialization,
cloud initinitializationswith user data scripts, configurations inside /etc
🛠️Possible Issues & Resolutions
☁️AWS
Misconfigured /etc/fstab
If the ec2 instance is misconfigured on /etc/fstab then we could use the disk mounted on ec2 instance inside / partition, we could mount to another ec2 instance and use that instance to fix the issue.
Steps:
1. Navigate to the ec2 instance which is corrupted. (checks would fail on the instance)
2. From instance state get the screenshot of the current state inside the ec2 instance which would give more insight of the root cause of the issue.
3. Power off the corrupted instance
4. Inside the storage detach the EBS storage which is mounted on the / partition.
5. Create new instance and attach the corrupted detached disk as new disk inside new ec2 instance
6. Inside the new ec2 instance new disk is seen.
7. Using file command to know which partition is the old / partition.
file -s /dev/nvme2n1p1
8. Mount this to any of the temporary file and patch the issue in this directory.
mount -t xfs -o nouuid /dev/nvme2n1p1 /mnt
9. Update the /etc/fstab and fix the corrupted entry.
10. Reattach the storage to the old ec2 instance and try powering up the instance.
🐧VM
Misconfigured /etc/fstab
Attach the live iso to the seperate disk in the VM then after follow the same process as that of the ec2 instance to fix any of the issues whether it be as normal as /etc/fstab or updating the sysctl configurations.
Stuck in boot:
Edit the grub config during the boot append the line at the end to boot into rescue mode.
systemd.unit=rescue.target
Once you would be booted to the rescue mode you could use the commands below to dig down the issues in the boot process and why is issues is raised.
| Command | Result Obtained |
|---|---|
systemd-analyze |
Total boot time |
systemd-analyze critical-chain |
Check systemd unit startup ordering and critical path |
systemd-analyze plot > boot.svg |
Visual timeline of the boot |
systemd-analyze blame |
Show boot time breakdown per-unit breakdown |
journalctl -xb |
Current boot logs with explanations |
journalctl -b -1 --priority=err |
View boot logs from previous failed boot |
journalctl --list-boots |
List all recorded boots |
Rebuild Initramfs if corrupted
dracut --force /boo/initramfs.$(uname -r).img $(uname -r)
Best Practise
Always keep at least one known-good kernel entry in GRUB. Use gruby --default-kernel
to verify the default kernel before rebooting other updates.
Pitfall
Editing /boot/grub2/grub.cfg directly instead of using grub2-mkconfig. Direct edits are overwritten on kernel updates.
Directory Structure
| Directory | Used For |
|---|---|
/etc |
Storing the configurations of the services installed. |
/var |
Storing the logs of the services or the system. |
/home |
Home directory of the new users created |
/usr |
Storing the user's application, libraries, documentations and binaries for all users |
/bin |
Store the executable for the basic system operations |
/opt |
Installing the additional custom applications |
/tmp |
World writeable directory created by the systems and application. Would clear the files inside this directory after reboot. |
In cloud environment the logs that are generated inside /var/log are shipped to CloudWatch Logs
Users, Groups, Permissions
Most general commands used for the user and group manipulation in Linux are:
chmod chown usermod useradd groupadd
For creating a system user whose id is less than 1000, we could:
usermod -r -s /bin/bash birat
This would create a system user birat like that of mysql, nginx, tomcat, wildfly, docker, kubeadm and such.
| Linux | AWS |
|---|---|
| User | IAM User |
| Group | IAM Group |
| Permission | IAM Policy |
| Root | AWS root |
In AWS IAM are collections of individual users used to simplify the permission management by attaching policies which is created in json format by defining the allowed actions (e.g. read-only, admin) to the group rather than individual users. Users could belong to the multiple group, and would inherit all the permissions.
E.g.: AM policy if the user belongs to multiple groups like: One group is admin with full access to aws resources across all regions and another group has read only access to limited resources like: ec2, s3 in us-east1 then the user would have full admin privilege across all region
E.g: Only Use explicit deny for the guardrails only. like: 1. Restrict regions change and deploy/build resources across other regions. 2. Prevent deletion of the resources
IAM Decision Order
Explicit Deny -> Highest priority Explicit Allow -> Evaluated only if no deny Default Deny -> Fallback
Process, threads, signals
Process
- A single running instance of a program
- Uses memory space and seperate cgroups and namespace
- Has file Decriptors
Threads
- Its a light weight execution of a process.
- Single process would have multiple threads
- They share the same namespace as that of process
- They share the memory with other threads spawned from the process
Signals
- Its a notification mechanism that is sent to a process
- They tell the process about shutting down the process.
Notifications and its meanings:
| Signal | Meaning |
|---|---|
SIGTERM |
fracefull shutdown |
SIGKILL |
force kill |
SIGHUP |
reload configurations |
Key Differences
| Feature | Process | Thread | Signal |
|---|---|---|---|
| Type | Execution unit | Sub-unit | Control mechanism |
| Memory | Isolated | Shared | No memory |
| Communication | IPC | shared memory | async event |
| Creation cost | High | Low | Very low |
| Example | nginx | worker thread | kill command |
Systemd and service lifecycle
Systemd
Its the service and system management software which would initialize the system, manages services and control the system resources from startup time and runtime. Systemd replaces the init system with new systemd as it is faster than init.d. This is the first process that is started in the system with PID 1
Commands and Details of Systemd
| Command | Used for |
|---|---|
systemctl --version |
Checking version of systemd |
systemctl list-units |
List all the systemd services loaded and running on the system |
systemctl isolate graphical.target |
Switch to the graphical interface. Could use same concept to troubleshoot any stage |
systemctl edit servicename |
Edit the systemd service file. |
systemctl daemon-reload |
To refresh the configuration that is changed on the service file. |
systemctl list-units --type=timer |
Get all the timers and its associated schedules and services |
systemctl start/stop/status servicename |
To get the status of the service that is running on the system. |
journalctl -xeu servicename |
To view the logs of the service that ran |
journalctl -u servicename --since "since 30 minutes ago" |
shows logs of the systemd service of last 30 minutes. |
journalctl -u servicename -p err --since "since n minutes ago" |
Shows only error message of the service of last n minutes |
Systemd Service inside AWS
| Service Name | Used for |
|---|---|
cloud-init |
Running user data and assigning IP to the new instance. Configure instance on first boot. |
amazon-ssm-agent |
automation and patching the aws instance incase of any issues. Its equivalent to vmware tools but for AWS. It does not use SSH access. |
amazon-cloudwatch-agent |
This service sends the logs on /var/logs to CloudWatch |
Packages and Repositories
Packages
Its the compiled binaries in Linux which would perform the sets of tasks. Suppose if you want to know if server is reachable or not, then you could use the ping command. Then this ping command is the package. Or, if you want to browse the internet then you would need browser so the Firefox, brave, google chrome is the package.
| OS | package manager |
|---|---|
| Red Hat | yum/ dnf |
| Debian | apt |
| Arch | pacman |
| OpenSuse | zypper |
| Alpine | apk |
| Command | Example | Purpose |
|---|---|---|
yum install |
yum install -y ip-utils |
Install the specific packages like ping |
yum remove |
yum remove -y ping |
remove the installed packages |
yum search |
yum search ping |
Search for the package based on name |
yum info |
yum info ping |
Lists description of the package |
yum update |
yum update -y nginx |
update the specific package or just yum update -y for updating entire packages installed. |
yum repolist |
yum repolist |
List all the repositories set up on the system. |
yum history |
yum history |
Give the history of the past operations on yum packages. |
yum history undo <ID> |
yum history undo 2 |
this would redo the transactions. |
yum localinstall <rpm package> |
yum localinstall nginx.rpm |
This would install the nginx package that is downloaded to the machine. |
rpm -qa |
rpm -qa |
This would list all the packages installed on the system. |
Repositories
Repositories are the sets of urls which would have the information of the packages that is to be installed. The configuration file for yum and related utilities is located at /etc/yum.conf and for defining the individual files for the downloading the packages the repositories could be configured in /etc/yum.repos.d/ directory.
If working on air-gapped environment or faster installation of the packages we could use the offline method by directly mounting the iso files to download the packages by adding local repositories. Its ideal for datacenters, productions, labs, servers. This provides the centralized package management.
Offline Package Repository
1. Purpose
Provide a centralized package source on ServerA for offline RHEL 8/9 clients (ServerB, ServerC, etc.) using:
rhel-iso/for BaseOS and AppStreamcustom/for manually uploaded RPMsepel/optionally, only if you separately obtain real EPEL package content
This supports normal yum install / dnf install on clients with no direct internet access, as long as packages and metadata are present on ServerA. (Red Hat Documentation)
2. Scope
Applies to:
- RHEL 8 / RHEL 9
- Rocky Linux 8/9
- AlmaLinux 8/9
This SOP assumes:
- ServerA hosts packages over HTTP
- ServerB consumes those repositories
- Binary DVD ISO is available for the same major version and architecture as the clients
3. Architecture
Repository server layout on ServerA:
/var/www/html/repos/
├── rhel-iso/          # copied or bind-mounted ISO content
├── custom/            # uploaded RPMs + repodata
└── epel/              # optional extra repo content
Client access pattern on ServerB:
http://<ServerA>/repos/rhel-iso/BaseOShttp://<ServerA>/repos/rhel-iso/AppStreamhttp://<ServerA>/repos/custom
4. Prerequisites
4.1 Platform prerequisites
- ServerA installed and reachable from clients over HTTP
- ServerA and clients on matching OS major version and architecture
- RHEL 8/9 Binary DVD ISO available
- Sufficient disk space for ISO copy and custom RPMs
- Root or sudo access on ServerA and clients
4.2 Package prerequisites on ServerA
Install these on ServerA:
dnf install -y httpd createrepo_c rsync
createrepo_c is required to generate repository metadata for the custom repo. Apache/httpd is used to publish content over HTTP. Creating a Yum/DNF repository requires metadata generation in the RPM directory. (Red Hat Documentation)
4.3 Network prerequisites
From ServerB to ServerA:
- TCP/80 reachable
- name resolution or static IP available
4.4 Security prerequisites
Decide whether you will:
- bootstrap with
gpgcheck=0, or - later implement signed repositories
This SOP uses gpgcheck=0 for offline bootstrap simplicity.
5. Implementation Procedure
5.1 Create repository directories on ServerA
mkdir -p /var/www/html/repos/{rhel-iso,custom,epel}
mkdir -p /mnt/rhel-iso
5.2 Mount the Binary DVD ISO on ServerA
If using an ISO file:
mount -o loop /path/to/rhel-9.x-x86_64-dvd.iso /mnt/rhel-iso
If using attached virtual media:
mount /dev/sr0 /mnt/rhel-iso
Validate expected repository trees:
ls -1 /mnt/rhel-iso
You should see content such as BaseOS, AppStream, and media.repo. RHEL installation media contains BaseOS and AppStream content used during installation. (Red Hat Documentation)
5.3 Publish ISO content under Apache
Preferred method: copy ISO contents
rsync -aH /mnt/rhel-iso/ /var/www/html/repos/rhel-iso/
This is operationally simpler than relying on persistent bind mounts.
Alternative method: bind mount
mount --bind /mnt/rhel-iso /var/www/html/repos/rhel-iso
If you use bind mount, persist it in /etc/fstab after validation.
5.4 Initialize the custom repository
Create metadata even if the repo starts empty or nearly empty:
createrepo_c /var/www/html/repos/custom
A valid RPM repository requires generated repodata/. (Red Hat Documentation)
5.5 Start and enable Apache
systemctl enable --now httpd
systemctl status httpd --no-pager
5.6 Open firewall for HTTP
If firewalld is enabled:
firewall-cmd --permanent --add-service=http
firewall-cmd --reload
5.7 Restore SELinux contexts
restorecon -Rv /var/www/html/repos
This ensures Apache can serve copied content under the standard web root.
6. Client Configuration on ServerB
Create /etc/yum.repos.d/internal-offline.repo:
[internal-baseos]
name=Internal BaseOS
baseurl=http://192.168.25.15/repos/rhel-iso/BaseOS
enabled=1
gpgcheck=0

[internal-appstream]
name=Internal AppStream
baseurl=http://192.168.25.15/repos/rhel-iso/AppStream
enabled=1
gpgcheck=0

[internal-custom]
name=Internal Custom Repo
baseurl=http://192.168.25.15/repos/custom
enabled=1
gpgcheck=0
Then refresh metadata on the client:
yum clean all
yum makecache
yum repolist
BaseOS provides the core OS functionality; AppStream provides additional user-space applications and runtimes. Both are standard RHEL 8/9 repositories. (Red Hat Documentation)
7. Installing Packages from ServerB
Examples:
yum install -y vim
yum install -y tcpdump
yum install -y mtr
Behavior:
- If a package exists in
BaseOSorAppStream, ServerB downloads it from ServerA’s ISO-backed repo. - If a package exists only in
custom/, ServerB downloads it from ServerA’s custom repo. - Dependencies are resolved from all enabled internal repos on ServerA. DNF/YUM resolves packages from enabled repositories using their metadata. (dnf-plugins-core.readthedocs.io)
8. Adding New Packages Later
8.1 Add extra RPMs to the custom repo on ServerA
cp /incoming/*.rpm /var/www/html/repos/custom/
createrepo_c --update /var/www/html/repos/custom
restorecon -Rv /var/www/html/repos/custom
createrepo_c --update refreshes metadata for an existing repository after adding packages. (Red Hat Documentation)
8.2 Refresh cache on clients
yum clean metadata
yum makecache
8.3 Install normally on clients
yum install -y <package>
9. Optional: EPEL Handling
Do not confuse epel-release with the actual EPEL repository content.
epel-releaseis mainly the package that drops a repo definition onto a host- it does not contain the full installable package set
Only use /var/www/html/repos/epel if you actually copied or mirrored EPEL package content there. For offline use, that content must be obtained separately.
10. Validation Procedure
10.1 Validate on ServerA
Check metadata endpoints:
curl -I http://127.0.0.1/repos/rhel-iso/BaseOS/repodata/repomd.xml
curl -I http://127.0.0.1/repos/rhel-iso/AppStream/repodata/repomd.xml
curl -I http://127.0.0.1/repos/custom/repodata/repomd.xml
Expected result:
- HTTP 200
If using ServerA IP:
curl -I http://192.168.25.15/repos/rhel-iso/BaseOS/repodata/repomd.xml
10.2 Validate on ServerB
yum clean all
yum makecache
yum repolist
yum info bash
yum info vim
yum info mtr
Expected result:
- internal repositories visible in
yum repolist - package metadata returned by
yum info - installs succeed without internet
10.3 Functional validation
Install one package from each source:
yum install -y bash
yum install -y vim
yum install -y <custom-package>
11. Rollback Procedure
11.1 Rollback client repo change
If client installs fail after repo cutover:
- disable the custom repo file:
mv /etc/yum.repos.d/internal-offline.repo /etc/yum.repos.d/internal-offline.repo.disabled
- clean cache:
yum clean all
- re-enable prior repo definitions or restore backed-up
.repofiles
Recommended before change:
cp -a /etc/yum.repos.d /etc/yum.repos.d.backup.$(date +%F-%H%M%S)
11.2 Rollback custom repo content on ServerA
If newly added RPMs break resolution:
- remove the newly added RPMs
- rebuild metadata
rm -f /var/www/html/repos/custom/<bad-package-pattern>*.rpm
createrepo_c --update /var/www/html/repos/custom
restorecon -Rv /var/www/html/repos/custom
11.3 Rollback ISO publication
If copied ISO content is wrong or corrupted:
rm -rf /var/www/html/repos/rhel-iso/*
rsync -aH /mnt/rhel-iso/ /var/www/html/repos/rhel-iso/
restorecon -Rv /var/www/html/repos/rhel-iso
11.4 Service rollback
If Apache changes break publication:
systemctl restart httpd
journalctl -u httpd -n 100 --no-pager
If necessary, revert Apache config from backup.
12. Troubleshooting
12.1 Symptom: yum makecache fails on ServerB
Check:
curl -I http://192.168.25.15/repos/rhel-iso/BaseOS/repodata/repomd.xml
curl -I http://192.168.25.15/repos/custom/repodata/repomd.xml
Likely causes:
- HTTP blocked by firewall
- Apache not running
- wrong
baseurl repodata/missing in custom repo
A reposync copy with --download-metadata is directly usable, while a custom RPM directory needs createrepo_c. (dnf-plugins-core.readthedocs.io)
12.2 Symptom: package not found
Check:
yum repolist
yum list available | grep -i <package>
Likely causes:
- package is not on the ISO
- package was not copied to
custom/ - client is only pointed to BaseOS/AppStream, not custom
12.3 Symptom: dependency resolution failure
Likely causes:
- missing dependency RPMs in
custom/ - required package exists in a repo not enabled on ServerB
- mixed OS major versions
- architecture mismatch
12.4 Symptom: No available modular metadata for modular package
This is a known issue when creating a local repository from a small set of modular packages. Red Hat documents that modular packages need modular metadata; modulesync is recommended for redistribution of modular content. (Red Hat Customer Portal)
Action:
- use full ISO AppStream where possible
- avoid cherry-picking modular RPMs into
custom/ - if redistributing modules, build repo content with
dnf modulesync
12.5 Symptom: Apache serves 403/404
Check:
systemctl status httpd --no-pager
ls -ld /var/www/html/repos
ls -l /var/www/html/repos/rhel-iso/BaseOS/repodata/repomd.xml
getenforce
restorecon -Rv /var/www/html/repos
Likely causes:
- SELinux context incorrect
- file path wrong
- Apache stopped
- bind mount missing after reboot
12.6 Symptom: wrong packages or dependency conflicts
Check:
cat /etc/redhat-release
uname -m
yum repolist -v
Likely causes:
- ServerA and ServerB are on different major versions
- x86_64 vs aarch64 mismatch
- stale metadata on client
13. Operational Controls
13.1 Change control
Before changing repos on ServerA:
- back up client
.repodefinitions - log package additions to
custom/ - keep a manifest of uploaded RPMs
13.2 Recommended manifest file
On ServerA:
find /var/www/html/repos/custom -maxdepth 1 -name "*.rpm" -printf "%f\n" | sort > /var/www/html/repos/custom/PACKAGE_MANIFEST.txt
13.3 Patch cadence
- ISO-backed BaseOS/AppStream is static until you replace the ISO
custom/changes whenever you upload new RPMs- document every refresh of
createrepo_c --update
13.4 Snapshot strategy
Before major changes:
cp -a /var/www/html/repos/custom /var/www/html/repos/custom.backup.$(date +%F-%H%M%S)
If the filesystem supports hardlinks/snapshots, use them to reduce storage overhead. Red Hat notes that frozen repository copies can be maintained and deduplicated with hardlinks on the same filesystem. (Red Hat Customer Portal)
14. Exact Command Set
14.1 ServerA build steps
dnf install -y httpd createrepo_c rsync

mkdir -p /var/www/html/repos/{rhel-iso,custom,epel}
mkdir -p /mnt/rhel-iso

mount -o loop /path/to/rhel-9.x-x86_64-dvd.iso /mnt/rhel-iso
rsync -aH /mnt/rhel-iso/ /var/www/html/repos/rhel-iso/

createrepo_c /var/www/html/repos/custom

restorecon -Rv /var/www/html/repos

systemctl enable --now httpd

firewall-cmd --permanent --add-service=http
firewall-cmd --reload

curl -I http://127.0.0.1/repos/rhel-iso/BaseOS/repodata/repomd.xml
curl -I http://127.0.0.1/repos/rhel-iso/AppStream/repodata/repomd.xml
curl -I http://127.0.0.1/repos/custom/repodata/repomd.xml
14.2 ServerB repo definition
[internal-baseos]
name=Internal BaseOS
baseurl=http://192.168.25.15/repos/rhel-iso/BaseOS
enabled=1
gpgcheck=0

[internal-appstream]
name=Internal AppStream
baseurl=http://192.168.25.15/repos/rhel-iso/AppStream
enabled=1
gpgcheck=0

[internal-custom]
name=Internal Custom Repo
baseurl=http://192.168.25.15/repos/custom
enabled=1
gpgcheck=0
14.3 ServerB validation
yum clean all
yum makecache
yum repolist
yum info bash
yum info vim
14.4 Add custom RPMs later on ServerA
cp /incoming/*.rpm /var/www/html/repos/custom/
createrepo_c --update /var/www/html/repos/custom
restorecon -Rv /var/www/html/repos/custom
14.5 Refresh on ServerB
yum clean metadata
yum makecache
yum install -y <package>
15. Final Notes
For RHEL 8/9, this is the stable production pattern:
- BaseOS/AppStream from Binary DVD ISO
- custom/ for extra RPMs
- Apache publication from ServerA
- clients consume only internal HTTP repos
The only place you need extra caution is modular packages in AppStream. For those, prefer the full ISO AppStream repo or use modulesync rather than manually copying a handful of modular RPMs. (dnf-plugins-core.readthedocs.io)
If you want this turned into a Markdown file formatted for MkDocs/Obsidian, I can structure it with callouts, command blocks, and troubleshooting anchors.
ResourceIsolation
For Isolating the resources and process, Linux uses two kernel features cgroups and namespaces
Cgroups & Namespaces
Control Groups (cgroups) and namespaces are the two Linux kernel features that make containers possible. Namespaces provide process isolation by creating separate views of system resources - PID namespace gives containers their own process tree (PID 1 inside container), network namespace provides isolated network stacks, mount namespace gives separate filesystem views, UTS namespace allows separate hostnames, and user namespace maps container UIDs to host UIDs for rootless containers.
Cgroups provide resource limiting and accounting. They organize processes into hierarchical groups and enforce limits on CPU time, memory usage, I/O bandwidth, and device access. Cgroups v2 (unified hierarchy) is now the default on modern kernels and uses a single hierarchy with all controllers. This is what containerd and Docker use under the hood - when you pass --memory=512m to docker run, it creates a cgroup with memory.max set to 536870912 bytes.
To limit a runaway process manually using cgroups v2, you create a new cgroup, set resource limits, and move the process into it. This is extremely useful for emergency situations where a process is consuming excessive resources but you cannot immediately kill it.
# Create a new cgroup
sudo mkdir /sys/fs/cgroup/limited_group
# Set memory limit to 512MB
echo 536870912 | sudo tee /sys/fs/cgroup/limited_group/memory.max
# Set CPU limit to 50% of one core
echo '50000 100000' | sudo tee /sys/fs/cgroup/limited_group/cpu.max
# Move a runaway process (PID 12345) into the limited group
echo 12345 | sudo tee /sys/fs/cgroup/limited_group/cgroup.procs
# Verify
cat /sys/fs/cgroup/limited_group/cgroup.procs
cat /sys/fs/cgroup/limited_group/memory.current
# View namespace of a container process
ls -la /proc/<PID>/ns/
lsns                                   # List all namespaces
nsenter -t <PID> -n ip addr            # Enter network namespace
Best Practise
Use sytemd resource controls (MemoryMax=, CPUQuota=) for services rather than manually managing cgroups since systemd already manages cgroup hierarchy.
Pitfall
Mixing cgroups v1 and cgroups v2 controllers caused unpredictable behavious. Check
mount|grep cgroup
Inspecting container cgroup limits:
# Find container cgroup path
CONTAINER_ID=$(docker inspect --format '{{.Id}}' myapp)
cat /sys/fs/cgroup/system.slice/docker-${CONTAINER_ID}.scope/memory.max

# Check if a pod was OOMKilledkubectl describe pod <pod> | grep -A5 "Last State"
# Look for: Reason: OOMKilled

# Set kernel parameters for container workloads
sysctl -w vm.swappiness=10sysctl -w net.ipv4.ip_local_port_range="1024 65535"sysctl -w net.core.somaxconn=65535sysctl -w fs.inotify.max_user_watches=524288sysctl -w fs.inotify.max_user_instances=512
Persistent kernel tuning for Kubernetes nodes (/etc/sysctl.d/99-k8s.conf):
# Network performance
net.core.somaxconn = 65535
net.ipv4.tcp_max_syn_backlog = 8192
net.core.netdev_max_backlog = 16384
net.ipv4.tcp_slow_start_after_idle = 0
net.ipv4.tcp_tw_reuse = 1

# Memory
vm.swappiness = 1
vm.overcommit_memory = 1
kernel.panic = 10
kernel.panic_on_oops = 1

# inotify (critical for many k8s components)
fs.inotify.max_user_watches = 524288
fs.inotify.max_user_instances = 512

# Conntrack for high-traffic nodes
net.netfilter.nf_conntrack_max = 1048576
net.netfilter.nf_conntrack_tcp_timeout_established = 86400